" height="15.65460401053985px" id="E2hITFMIY" width="89px"/><path d="M 15.154 0 L 6.296 0 C 5.965 0 5.657 0.167 5.473 0.446 C 5.289 0.725 5.255 1.078 5.38 1.389 C 5.43 1.511 5.504 1.621 5.598 1.714 C 5.783 1.903 6.034 2.01 6.296 2.01 L 13.158 2.01 C 12.949 3.493 12.28 4.868 11.247 5.936 L 11.198 5.987 L 11.149 6.037 C 10.099 7.086 8.747 7.765 7.29 7.977 C 5.94 8.177 4.562 7.968 3.329 7.374 C 2.634 7.038 1.998 6.588 1.447 6.041 L 1.398 5.99 L 0 7.414 C 0.221 7.641 0.455 7.854 0.699 8.054 C 0.908 8.224 1.126 8.39 1.351 8.542 C 1.967 8.962 2.632 9.301 3.332 9.552 C 3.972 9.784 4.637 9.938 5.312 10.013 C 5.971 10.089 6.635 10.089 7.293 10.013 C 8.711 9.856 10.07 9.353 11.254 8.545 C 11.739 8.214 12.192 7.837 12.605 7.417 C 12.829 7.192 13.039 6.954 13.235 6.703 C 13.405 6.492 13.563 6.272 13.711 6.044 C 14.506 4.84 15.001 3.458 15.155 2.016 C 15.192 1.682 15.21 1.346 15.21 1.01 C 15.209 0.673 15.19 0.335 15.155 0 Z" fill="rgb(8, 46, 57)" height="10.070297475553705px" id="SUqhhb7Az" transform="translate(2.507 7.93)" width="15.210335938094289px"/></g></g></svg>)
Best practices
How to document cargo damage with photos: Practical rules

Most disputes over cargo damage aren't lost on the facts. They're lost on the photo. A blurry shot, a missing angle, or no scale reference and a valid claim turns into a back-and-forth that drags on for weeks.
We reviewed more than 1,000 inspection photos to see what separates evidence that gets a claim closed fast from evidence that gets questioned. The patterns held up across markets and cargo types. Here are the 12 rules that came out of it, grouped into four areas: framing, light, camera quality, and visibility.
Composition and framing
Get the angle right. Shooting from an angle hides or distorts damage. Stand directly in front of the subject and centered before raising the camera, and keep the phone level. A tilted shot changes how big or small something looks, which matters when someone downstream is judging severity from the image alone.
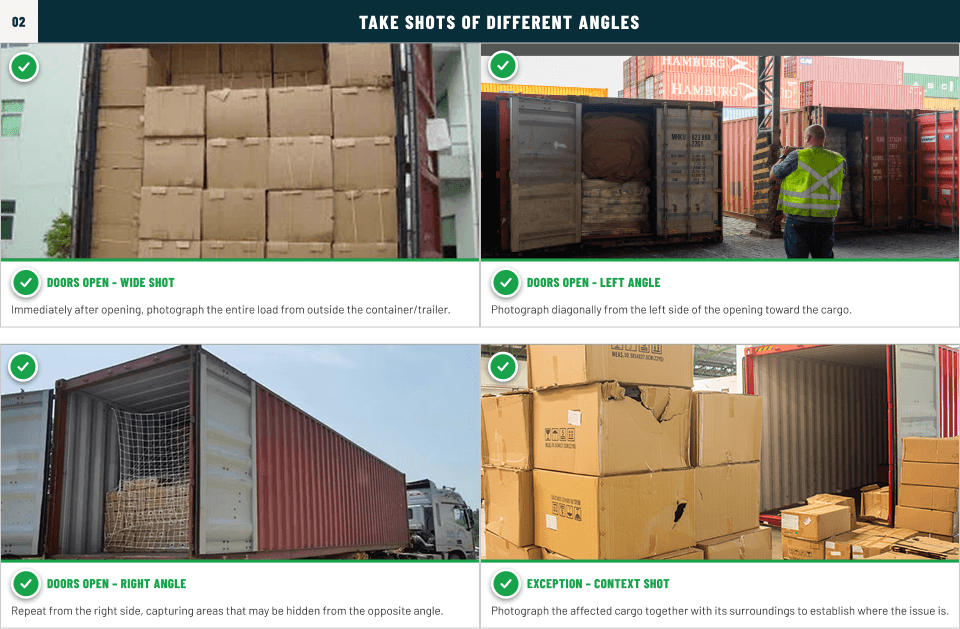
Take shots from different angles. One photo from one spot never tells the whole story. As soon as the doors open, take a wide shot of the entire load from outside. Then move to the left and right sides and shoot diagonally toward the cargo, since each angle reveals areas the other hides. If the damage affects the surroundings too, add a context shot that shows the affected cargo alongside what's around it.
Don't get too close. Cropping off the edges of the container or the pallet leaves the viewer guessing what's outside the frame. Back up until all four corners are visible in the preview before shooting. Use landscape for wide subjects and portrait for narrow ones, and check the corners of the preview every time before pressing the shutter.
Match orientation to the subject. Holding the phone vertically for a wide subject like a container interior wastes most of the frame and adds black bars. Always shoot wide subjects in landscape, use your phone's level indicator to confirm you're horizontal, and rotate the phone before you focus, not after you've already framed the shot.
Light and exposure
Make sure there's enough light. An unlit interior swallows labels and fine detail into shadow, even if the damage itself is technically visible. Open both doors fully and angle them so sunlight reflects into the interior. For sealed trailers, use a portable LED or phone torch held at 45 degrees to avoid hotspots. Zoom into the preview before moving on. If text or a label isn't readable there, it won't be readable later either.
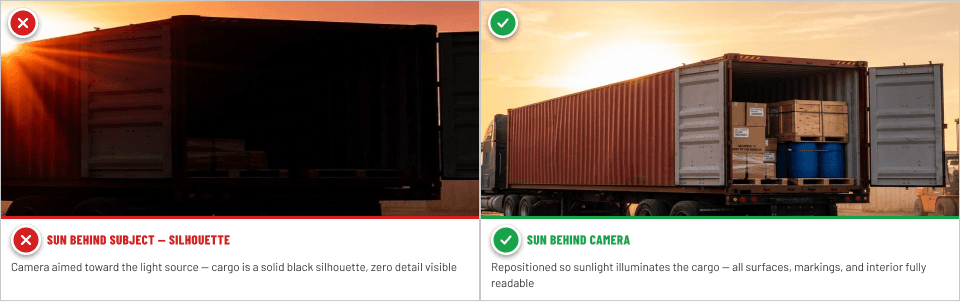
Watch for backlighting. Shooting toward the light turns the cargo into a silhouette with no visible detail. Check your own shadow before shooting. If it points toward the subject, the sun is behind you and working in your favor. If it points away, walk around until it doesn't. On overcast days, HDR mode can recover shadow detail when you can't reposition. Give yourself the full 30 seconds to walk around a subject before settling on the first shot you get.
Avoid glare and reflections. Direct light hitting a shiny surface, laminated cargo, stretch wrap, foil, tape, blows out exactly the detail you're trying to capture. Shoot at a 45-degree angle to reflective surfaces rather than straight on, and never straight on with a flash. If glare shows up in the preview, shift your position slightly until it clears rather than shooting through it.
Camera quality
Make sure the subject is in focus. Autofocus left to guess will often lock onto the background or the floor instead of the damage. Tap the subject on the screen to lock focus manually, hold the phone still for a full second afterward, and don't take the shot until the focus ring confirms. As a working standard, barcode lines and label text should be clearly separated in the shot, not fused into a blur.
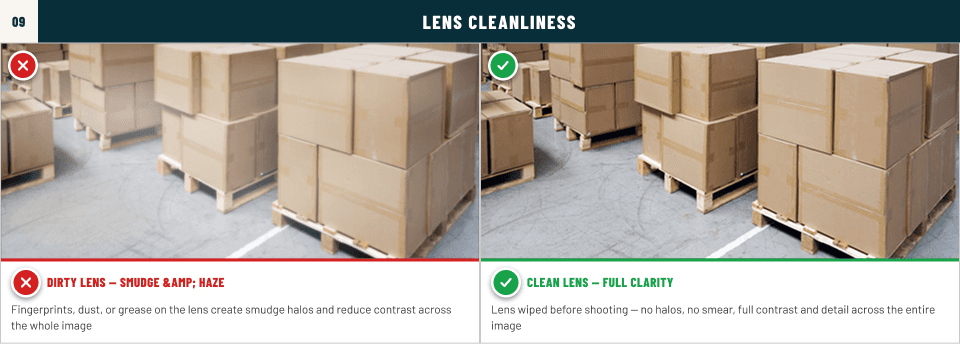
Keep the lens clean. A fingerprint or dust on the lens introduces haze across the entire image and nobody notices until the shot is already taken. Wipe the lens with a microfiber cloth before starting a documentation session, and recheck it every three to four photos in dusty or cold environments. If a smudge or glare shows up in a photo, clean the lens and retake it immediately rather than working around it.
Information and visibility
Show the size of the damage. A damaged item photographed on its own gives no sense of scale. Include a measurement tool, a hand, or another instantly recognizable object near the damage in every shot. Without something to compare against, whoever reviews the claim has no way to judge how serious it actually is.
Don't let objects block the evidence. Wrapping, ropes, and loose packaging in front of the cargo hide the very thing you're trying to document. Take two or three minutes to clear the foreground before shooting. If pallet wrap or film is covering the damage itself, move it aside carefully before photographing rather than shooting around it.
Pair wide shots with close-ups. A close-up alone tells you there's damage but not where it sits in the load. Always take a wide shot first to establish position, then move in for a close-up that fills the frame with just the damaged area. One without the other is incomplete documentation.
Pre-shot Checklist
Run through this before every inspection:
Correct angle and framing
Multiple angles covered
Not shot too close
Correct orientation for the subject
Adequate lighting
No backlighting
No glare or reflections
Sharp focus
Clean lens
Scale reference included
Clear view, nothing blocking
Photographed before and after
None of these rules require better equipment. They require slowing down for an extra 30 seconds per shot. That's usually the difference between a claim that closes on the first submission and one that gets sent back for more evidence.
Download the Warehouse Photography Guide
Want your warehouse team to have these rules available on the floor?
We've put together the Warehouse Photography Guide for Warehouse Teams with 12 practical rules for taking clear, consistent and useful logistics photos.
It's designed to be practical: download it, share it with your team or print it for the warehouse.